USB4 与 Thunderbolt 4 备忘

Summary

最近研究了一些关于 USB4 以及 Thunderbolt 4 的资料,在此做个备忘。目前只考虑 USB Type-C 接口,并且忽略 Type-C 可以正反随意插带来的复杂性。

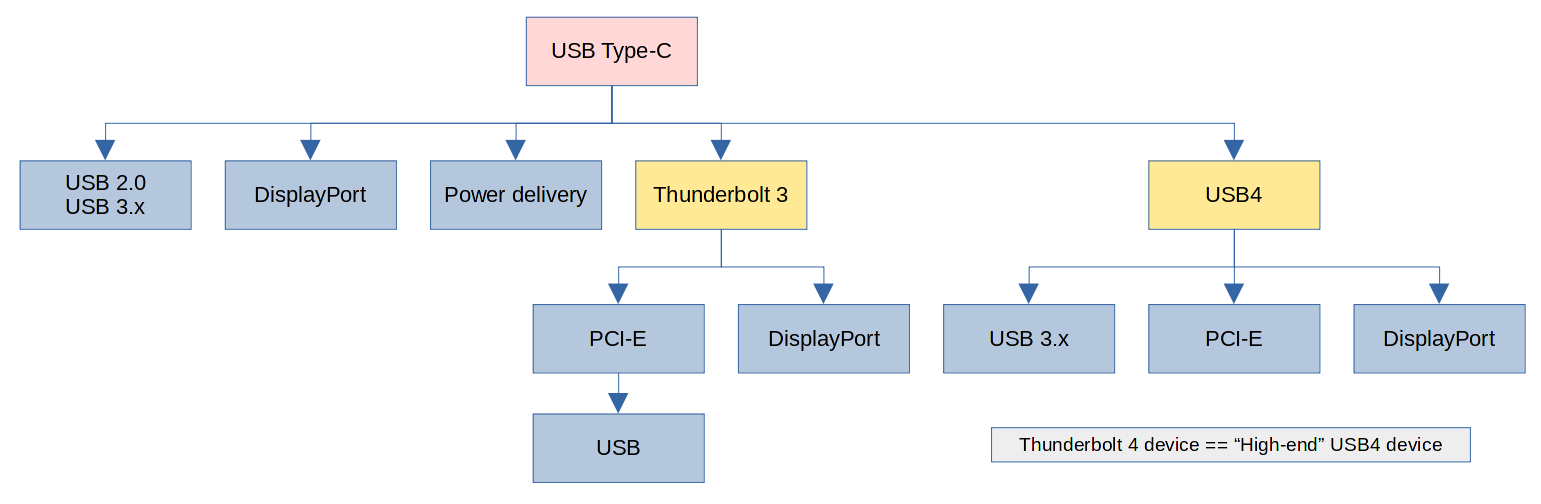
  1. USB Type-C 接口里有一对(两根)差分信号线,用于 USB 2.0 协议(USB 2.0, 480 Mbps)。
  2. USB Type-C 接口里有四根 GND 以及四根 V_BUS 用于送电,具体电压和电流由两端使用 CC 线协商 (Power delivery)。
  3. 在 Type-C 接口里再取两对差分信号线,用于 USB 3.x 协议(USB 3.2 Gen 1, 5 Gbps)。
  4. 通过改进协议,可以将传输速度翻倍(USB 3.2 Gen 2, 10 Gbps)。
  5. 再把 Type-C 中最后剩下四根信号线也用上,传输一样的协议,可以将速度再次翻倍(USB 3.2 Gen 2x2, 20 Gbps)。
  6. 大家发现这八根高速信号线不止可以用于 USB,也可以用来传输其他信号。比如:电脑可以与显示器透过 CC 线协商,使用两对差分信号线传输 DisplayPort 信号(DP Alt mode)。
  7. Intel 觉得 Type-C 接口不错,于是有了 Thunderbolt Alt mode,使用全部四对差分信号线传输 Thunderbolt 协议(Thunderbolt 3, 40Gbps)。
    Thunderbolt 3 本身是一种隧道协议,在这个隧道中可以传输 PCI-E 数据和 DisplayPort 数据。
    至于 USB 则可以在扩展坞中内置一个 USB 控制器芯片,通过 PCI-E 与电脑连接,这样扩展坞就可以插 USB 设备了。
  8. USB-IF 觉得 Thunderbolt 3 这个协议不错,在 Intel 开放了 Thunderbolt 3 协议后,就把它拿过来“改名”成了 USB4。使用 USB Type-C 中的两对或四对差分信号线传输(USB4, ~40Gbps)。
    与 Thunderbolt 3 相同,USB4 也是一种隧道协议,其中可以传输 USB 3.2,PCI-E,DisplayPort 等协议。
    (吐槽时间:外层协议和内层协议都叫 USB 你是认真的吗?)
    USB4 规范并不要求硬件生产厂家实现所有功能,比如说,一个最高只支持 20Gbps 速度的设备可以合法地被称作“支持 USB4”。因为 USB4 规范并不要求所有设备都支持 40Gbps。(吔屎啦你 USB-IF)
  9. Intel 觉得 USB-IF 的标准混乱,是赚钱的好机会,于是自己列了一套更高的标准(比如要求设备必须支持 40Gbps 速度),并给符合 Intel 的标准的设备贴上 “Thunderbolt 4” 的标签。

最后围观 USB4 混乱的速度要求被鞭尸的现场:https://youtu.be/ly5-QHjs8Gw?t=1845

Allison Sheridan: So a Thunderbolt 4 device is a USB4 device...
Brad Saunders:    (nodding)
Allison Sheridan: ...but a USB4 device is not necessarily a Thunderbolt 4 device?
Brad Saunders:    It can be ...
Allison Sheridan: It can be but it isn't necessarily.
Brad Saunders:    It'll probably have... they may have made a choice to... maybe it's only 20 Gbps.
Allison Sheridan: Right, but it's Thunderbolt 4 it's 40 [Gbps] per second, Okay.

手动硬盘安装 WePE

最近尝试了一些 Windows 下的全盘备份/恢复方案,于是顺便折腾了一下各种 WinPE 系统。WinPE 简单来说就是一个 Windows 的 LiveCD,带有各种用于 Windows 的工具。网友们在微软的 WinPE 基础上加入各种驱动和方便使用的图形化操作界面,作为不同的 WinPE “发行版”发布,微PE(WePE) 是这些“发行版”之一。

WePE 自带的安装程序除了安装必要的启动项以外还会安装一些没啥用的选项。所以记录一下手动安装启动项的方法。环境为 Windows 10 64位 UEFI 启动。你需要先制作 WePE 的 ISO,然后把 ISO 里的WEPE目录复制到随便一个分区里,我假设是D:。用管理员身份执行以下命令:

1
2
3
4
5
6
7
8
9
10
11
12
13
14
15
16
17
bcdedit /create /device
# 你会拿到一串 GUID, 假设是 {A...}
bcdedit /set "{A...}" ramdisksdidevice partition=D:
bcdedit /set "{A...}" ramdisksdipath \WEPE\WEPE.SDI

bcdedit /create /d "WePE" /application osloader
# 你会拿到一串 GUID, 假设是 {B...}
bcdedit /set "{B...}" device "ramdisk=[D:]\WEPE\WEPE64.WIM,{A...}"
bcdedit /set "{B...}" osdevice "ramdisk=[D:]\WEPE\WEPE64.WIM,{A...}"
bcdedit /set "{B...}" path \windows\system32\boot\winload.efi
bcdedit /set "{B...}" systemroot \windows
bcdedit /set "{B...}" nx OptIn
bcdedit /set "{B...}" pae ForceEnable
bcdedit /set "{B...}" detecthal Yes
bcdedit /set "{B...}" winpe yes
bcdedit /displayorder "{B...}" /addlast
bcdedit /timeout 3

设定完启动项以后就可以把盘符删掉了。

Ciphersuite Memo

I'm sorry if you landed in this keywords soup only to find it not helpful.

  • Key Exchange

    • DH (Diffie-Hellman): \(g^{xy} = (g^x)^y = (g^y)^x\)
    • ECDH (Elliptic-Curve DH)
    • ECDHE (ECDH Ephemeral)
    • DHE (DH Ephemeral)
    • RSA (Encryption): Generate a random bitstream and share it with the peer by encrypting using peer's RSA public key.

    A related concept is PFS (Perfect Forward Secrecy). DH offers PFS while RSA cannot.

  • Authentication
    Also known as key-signing. Commonly used together with the PKI(Public Key Infrastructure).

  • Encryption
    Used for data confidentiality.

    A related concept is mode of operation,which turns a block cipher to a stream cipher. CBC is a commonly used one. When it's used with AES, it's expressed as AES-CBC

  • Message authentication
    Used for data integrity. These algorithms are also called MAC(Message authentication code).

  • Authenticated Encryption (AE)
    Combines confidentiality and integrity. Wikipedia: Authenticated Encryption.

    • EtM (Encrypt-then-MAC): A secure way to combine encryption algorithms with MAC algorithms.
    • GCM (Galois/Counter Mode): A mode of operation, when paired with a block cipher, offers AE (actually AEAD) in one step.

    Some commonly used AE methods:

    • AES-CBC with an HMAC e.g.AES128-CBC-HMAC-SHA256.
    • ChaCha20 with Poly1305.
    • AES-GCM
  • Authenticated Encryption with Associated Data (AEAD)
    Similar to AE, but allows extra unencrypted data (associated data) to be authenticated. Roughly speaking:

    ciphertext = Encrypt(plaintext)
    auth_tag = Mac(associated_data + ciphertext)

    A common use case for AEAD is when encrypting a network packet, you want the packet header to stay unencrypted (for network routing purposes) but still authenticated.

  • Note about DH and curves of EC-based algorithms
    DH-based algorithms may have a "Group" option, which specifies a prime field or an elliptic curve. If a prime field is used, such as modp2048, it's normal DH. If an elliptic curve group is used, such as ecp256, it's EC-based DH.
    Some other curves may be used:

IPsec 配置备忘 Part9 - RouterOS

点击此处回到系列文章目录

这篇来填一个在 Part1 的时候挖的坑,简单介绍一下怎么在 RouterOS 和 strongSwan 之间配置一个 Site-to-Site 的 IKEv2 VPN。如果你还没有动手实际配置过 strongSwan,我强烈建议你先读完至少 Part1~5 和 Part7,并且自己动手配置一个能用的 strongSwan 服务端。这样至少能保证你会配置 strongSwan,否则同时学习 RouterOS 和 strongSwan 两种配置方法会让人云里雾里。

网络结构

RouterOS 做路由器,用 DHCP 给内网设备分配192.168.50.0/24段中的 IP 地址。并且用 IPsec 的 Tunnel 模式将所有来自此 IP 段的数据转发至服务器22.22.22.22。路由器本身的 IP 并不重要。

Network topology

阅读基本 RouterOS 命令

在本文中我主要使用 RouterOS 命令来表示具体的配置,但是实际情况下调试 WebUI 会更方便。这里提供一张简图解释怎么阅读 RouterOS 的命令:
Command explanation

Flexget+systemd.timer 配置

之前一直都是手动检查每周新番并添加到 Transmission 中的,最近尝试把这一流程自动化一下。简单搜索了一下发现了 FlexGet 这个工具。支持 Transmission 也能在 Linux 下运行,就决定是它了。

安装到用户目录

ArchLinux 源里并没有这个包,又考虑到这是个 Python 程序,所以就决定直接用venv了:

1
2
3
4
5
6
mkdir ~/.config/flexget
cd ~/.config/flexget
python -m venv virtualenv
source virtualenv/bin/activate
pip install flexget
pip install transmission-rpc

配置文件

配置方法可以看教程也可以看官方文档。我就只简单贴一下。

~/.config/flexget/config.yml
1
2
3
4
5
6
7
8
9
10
11
12
13
14
15
templates:
transmission:
transmission:
host: 'https://domain-name.com/transmission/rpc'
port: 443
username: 'your-username'
password: 'your-password'

tasks:
这里随便写:
rss: 'https://mikanani.me/RSS/...'
accept_all: yes
template: transmission
transmission:
path: '/folder/path/on/server'

Systemd 配置

~/.config/systemd/user/flexget.service
1
2
3
4
5
6
[Unit]
Description=Refresh RSS with flexget

[Service]
Type=oneshot
ExecStart=/home/recursiveg/.config/flexget/virtualenv/bin/flexget execute

用户登录后 5 分钟进行同步,然后每两小时检查一次。

~/.config/systemd/user/flexget.timer
1
2
3
4
5
6
7
8
9
[Unit]
Description=Run flexget on login then every 2hrs

[Timer]
OnStartupSec=5min
OnUnitActiveSec=2h

[Install]
WantedBy=timers.target

一些可能会用到的命令:

1
2
3
4
5
6
7
8
# 启用并运行定时器
systemctl --user enable --now flexget.timer
# 立即检查
systemctl --user start flexget.service
# 检查定时器情况
systemctl --user list-timers
# 检查日志
journalctl --user-unit flexget.service -f

在 GNS3 中使用 ArchLinux

之前在折腾 strongSwan 配置的时候需要多台电脑互相连接做测试,用实机各种不方便。比方说,我不想暴露真实 IP,就只能在发布前手工编辑配置文件,也不知道编辑过后的文件到底能不能工作。于是尝试折腾使用 GNS3 来搭建一个虚拟的网络环境。

安装 GNS3

你可以尝试从 AUR 安装 GNS3,但是我之前试了几次都不是太成功,于是还是把 GNS3 装进了 virtualenv 里:

1
2
3
4
5
6
7
8
9
# 创建并进入 virtualenv
virtualenv -p python3.9 virtualenv
source virtualenv/bin/activate
# 安装 GNS3 及 PyQt5
pip install gns3-server gns3-gui pyqt5
# 安装一些其他的依赖(可能有漏的,请根据 gns3 的出错消息自己安装)
yay -S vpcs dynamips
# 启动 GNS3
gns3

GNS3 支持好几种方式来运行虚拟网络中的“节点”,我这里使用 Docker 来运行虚拟的 Archlinux 系统。因此也需要先安装:

1
2
3
sudo pacman -S docker
sudo usermod -aG docker `whoami`
sudo systemctl start docker

同时建议安装 Wireshark 方便抓包调试。

连接因特网

进入 GNS3 创建 Project 以后就可以尝试把左侧列表里的设备往中间画布上拖了。但是你会发现不仅设备类型少的可怜而且也基本拖不上去。这时我们需要自己创建设备节点的模板。进 Preferences,在最下面的 Docker containers 里点 New,Image name 输archlinux:base-devel,其他的都默认,Adapters 可以按自己需要指定数量。

点 OK 后,左侧的设备列表里就多了一个设备。拖到画布上,右键 Start,再右键 Console 就可以看到 ArchLinux 的命令行界面了。

GNS3 默认使用 xterm 作为终端模拟器,如果你像我一样使用 Gnome Terminal,需要先去 General - Console applications 把启动终端的命令改成

gnome-terminal -t "%d" -- telnet "%h" "%p"

这个新创建的 Archlinux 节点还是空空如也的,除了基本的系统什么也没有,我们可以把它连接到实际的网络上,这样就能用 pacman 安装软件包了。先从设备列表里拖一个“Cloud”设备出来,然后点左侧边栏最下面的“Add a link”切换到连线模式,点 Cloud 节点,选择物理机上用于联网的接口,再点 Archlinux 节点,选择要连接的端口,这样一条连线就接好了。Archlinux 节点被直接桥接到了外部接口上,和宿主机位于同一网段。

由于 Archlinux 的镜像不带 dhcpcd 无法自动获取 IP,只能手动设置一下咯:

ip link set eth0 up
ip addr add 192.168.1.222/24 dev eth0
ip route add default via 192.168.1.1 dev eth0
echo nameserver 1.1.1.1 > /etc/resolv.conf

不过实际测试以后发现这个速度实在是很残念,可能还是要写 Dockerfile 把镜像配置好再用才行。

IPsec 配置备忘 Part8 - iOS 客户端

⚠ 天坑预警 ⚠

我在 iOS 12/13/14 各一台设备上测试过,但是测试的时候不是次次都能工作。由于 iOS 的坑实在太多,以及不同版本的 iOS 的行为都不太一样,如果你碰到了我没碰到的坑我只能祝你好运 (<ゝω・)☆

点击此处回到系列文章目录

接 Part6。折腾完 Android 以后我们来折腾一下 iOS。基本原理都是一样的,只是需要把苹果那一套 Vendor-specific 的配置选项翻译成 strongSwan 的,这样才能和服务器上的 strongSwan 互相通信嘛。由于 iOS 上的 IKEv2 客户端不是 strongSwan 而是苹果自己魔改的不知道什么版本,所以坑比起 Android 客户端更多。幸好 strongSwan 项目已经帮我们都踩了不少坑了:见 iOS (Apple iPhone, iPad...) and macOSIKEv2 Configuration Profile for Apple iOS 8 and newer

坑坑坑

由于本 Part 是基于 Part6 的,所以我们先来列举一下会需要我们做调整的 iOS 的坑(大部分在 strongSwan 的文档里已经提到过了):

  1. iOS 的 local_id 和 remote_id 全部都是 FQDN 类型,意味着我们需要按照 Part7 的说明给证书加上dns_name的 SAN。
  2. iOS 不允许 p12 证书使用空密码。
  3. iOS 12 还不支持 ed25519,所以我们需要改用其他算法。
  4. iOS 的 mobileconfig 全是坑。
  5. iOS 需要在配置描述文件显式指定 CA 的 CN 才会发送 CERTREQ。
  6. 你需要在服务端配置文件的 pool 里指定一个 DNS,否则 iOS 连上后无法上网。

基本流程是:生成密钥和证书;生成 iOS 的mobileconfig配置描述文件;想办法把这个文件安装到 iOS 设备上;最后尝试连接。由于 iOS 的配置文件比 Android 的复杂许多,所以我写了个 Python 脚本来负责生成,如果你用 macOS 也可以从苹果下载官方的配置工具。